RTFM

[Read This Fine Material] from Joshua Hoblitt

“releasing an update is practically an act of aggression against your users”

| 0 comments

Everybody hates Firefox updates is one of the more insightful pieces I’ve seen on how disruptive the desktop software update process can be. However, I believe almost everything in the essay applies to website updates as well. The discussion of UI changes ‘because they are better’ reminds me a lot of what seems to have gone completely wrong with the gnome3 shell.

How to create a GPFS fileset and set a quota on it

| 0 comments

First, make sure that you have quotas enabled for your filesystem.

Create a new fileset with the mmcrfileset command.

[root@foo01 ~]# mmcrfileset foodata1 podi
Fileset 'podi' created.
[root@foo01 ~]# mmlsfileset foodata1
Filesets in file system 'foodata1':
Name                     Status    Path                                
root                     Linked    /net/foodata1                       
podi                     Unlinked  --                                  

Every GPFS filesystem has at least a “root” fileset at the bottom of the tree. It’s listed “path” is the mountpoint of the filesystem. Link the newly created fileset to the root fileset at some reasonable path. Note that you do not need to pre-create this directory path with mkdir.

[root@foo01 ~]# mmlinkfileset foodata1 podi -J /net/foodata1/podi
Fileset 'podi' linked at '/net/foodata1/podi'.
[root@foo01 ~]# mmlsfileset foodata1
Filesets in file system 'foodata1':
Name                     Status    Path                                
root                     Linked    /net/foodata1                       
podi                     Linked    /net/foodata1/podi             

The mmunlinkfileset command is the inverse of mmlinkfileset, should you need it.

[root@foo01 ~]# mmunlinkfileset foodata1 podi
Fileset 'podi' unlinked.

mmedquota creates quotas on users, groups, or filesets. It’s behavior is similar to crontab -e in that by default it drops you into a $EDITOR to create/change a quota.

[root@foo01 ~]# mmedquota -j foodata1:podi 
[root@foo01 ~]# mmlsquota
                         Block Limits                                    |     File Limits
Filesystem type             KB      quota      limit   in_doubt    grace |    files   quota    limit in_doubt    grace  Remarks
foodata1   USR         no limits                                    
[root@foo01 ~]# mmlsquota -j podi
                         Block Limits                                    |     File Limits
Filesystem type             KB      quota      limit   in_doubt    grace |    files   quota    limit in_doubt    grace  Remarks
foodata1   FILESET         128 9663676416 10737418240          0     none |        1       0        0        0     none 

Now you have to make a decision as to how you want df to behave. By default, GPFS has df show the size/usage of the complete name space but there are good reason to want it show the size of the containing fileset instead. Eg., for NFS exports.

The default behavior:

[root@foo01 ~]# df -k
Filesystem           1K-blocks      Used Available Use% Mounted on
[...]
/dev/foodata1        18737004544 1665675264 17071329280   9% /net/foodata1

Enabling per fileset df reporting. XXX I’m not clear if this takes affect on a mounted filessytem or if it needs to be remounted to take affect.

[root@foo01 podi]# mmchfs /dev/foodata1 --filesetdf 

Demonstration of per fileset df reporting:

[root@foonsd1 ~]# df -h /net/foodata1/
Filesystem            Size  Used Avail Use% Mounted on
/dev/foodata1          18T  1.6T   16T   9% /net/foodata1
[root@foonsd1 ~]# df -h /net/foodata1/podi/
Filesystem            Size  Used Avail Use% Mounted on
/dev/foodata1          10T  4.0M   10T   1% /net/foodata1

How to change the failure group of a GPFS disk

| 0 comments

When I ran mmcrnsd to setup the disks/nsds in this filesystem I did not specify any failure groups as at the time I was not interested in using metadata or data replication. Now I would like to have my two disks in seperate failure groups for metadata replication to work properly.

[root@foonsd1 ~]# mmlsdisk foodata1
disk         driver   sector failure holds    holds                            storage
name         type       size   group metadata data  status        availability pool
------------ -------- ------ ------- -------- ----- ------------- ------------ ------------
nsd1         nsd         512      -1 Yes      Yes   ready         up           system       
nsd2         nsd         512      -1 Yes      Yes   ready         up           system       

The mmchdisk can change almost all parameters set by mmcrnsd. Here I’m setting nsd1 into failure group 1 and nsd2 into failure group 2.

[root@foonsd1 ~]# mmchdisk foodata1 change -d nsd1::::1:::
Verifying file system configuration information ...
mmchdisk: Propagating the cluster configuration data to all
  affected nodes.  This is an asynchronous process.
[root@foonsd1 ~]# mmchdisk foodata1 change -d nsd2::::2:::
Verifying file system configuration information ...
mmchdisk: Propagating the cluster configuration data to all
  affected nodes.  This is an asynchronous process.

Verify the change.

[root@foonsd1 ~]# mmlsdisk foodata1
disk         driver   sector failure holds    holds                            storage
name         type       size   group metadata data  status        availability pool
------------ -------- ------ ------- -------- ----- ------------- ------------ ------------
nsd1         nsd         512       1 Yes      Yes   ready         up           system       
nsd2         nsd         512       2 Yes      Yes   ready         up           system       
Attention: Due to an earlier configuration change the file system
is no longer properly replicated.

The warning message is because I had previously changed the default metadata value from -m 1 to -m 2. No we can go ahead and restripe the filesystem’s replication.

[root@foonsd1 ~]# mmrestripefs foodata1 -R
Scanning file system metadata, phase 1 ... 
Scan completed successfully.
Scanning file system metadata, phase 2 ... 
Scan completed successfully.
Scanning file system metadata, phase 3 ... 
Scan completed successfully.
Scanning file system metadata, phase 4 ... 
Scan completed successfully.
Scanning user file metadata ...
 100.00 % complete on Mon Jun  4 14:09:45 2012
Scan completed successfully.

And the warning message when running mmlsdisk is now gone.

[root@foonsd1 ~]# mmlsdisk foodata1
disk         driver   sector failure holds    holds                            storage
name         type       size   group metadata data  status        availability pool
------------ -------- ------ ------- -------- ----- ------------- ------------ ------------
nsd1         nsd         512       1 Yes      Yes   ready         up           system       
nsd2         nsd         512       2 Yes      Yes   ready         up           system

How to root the Motorola Droid4 / XT894 on Gentoo Linux

| 1 Comment

This is the procedure I used to root my device running this firmware version. It’s possible the newer versions of firmware will not be rootable via this method. [Settings] -> [About Phone]
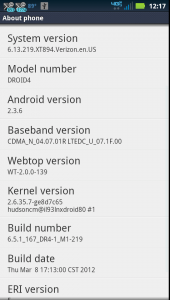
Droid4 About phone dialog

I found the code used for the privilege escalation in this androidevolved.com forum post.

Start by enabling USB debugging on the phone under the menu [Settings] -> [Applications] -> [Development] check USB debugging.
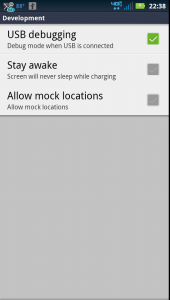
Droid4 Development menu

Connect the phone to the host via a USB port. You should see a new device show up in the kernel dmesg similar to the following and perhaps additional messages if the phone is set to act as a USB mass storage device.

usb 2-4: new high speed USB device number 8 using ehci_hcd

The phone should also notify you of the connection and allow you to open the “USB Connection” manager. It doesn’t matter which connection mode the phone is in as they will all work with adb.
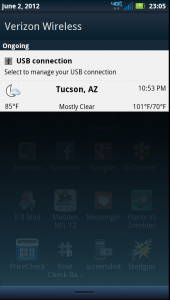
Droid4 USB connection notice
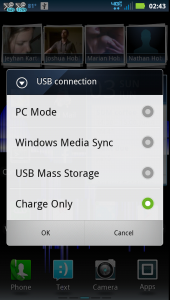
Droid4 USB connection mode dialog

Download and unzip Dan Rosenberg’s “motofail” Droid4 root exploit code. Here is a direct link to the Linux .zip file for the lazy.

jhoblitt@dull ~ $ mkdir droid4
jhoblitt@dull ~ $ cd droid4
jhoblitt@dull ~/droid4 $ wget http://vulnfactory.org/public/motofail_linux_osx.zip
--2012-06-03 02:53:23--  http://vulnfactory.org/public/motofail_linux_osx.zip
Resolving vulnfactory.org... 199.188.204.9
Connecting to vulnfactory.org|199.188.204.9|:80... connected.
HTTP request sent, awaiting response... 200 OK
Length: 1763681 (1.7M) [application/zip]
Saving to: `motofail_linux_osx.zip'

100%[======================================>] 1,763,681   1.79M/s   in 0.9s    

2012-06-03 02:53:24 (1.79 MB/s) - `motofail_linux_osx.zip' saved [1763681/1763681]

jhoblitt@dull ~/droid4 $ unzip motofail_linux_osx.zip 
Archive:  motofail_linux_osx.zip
   creating: motofail_linux_osx/
  inflating: motofail_linux_osx/su   
  inflating: motofail_linux_osx/run.sh  
  inflating: motofail_linux_osx/adb.osx  
  inflating: motofail_linux_osx/motofail  
  inflating: motofail_linux_osx/adb.linux  
  inflating: motofail_linux_osx/busybox  
  inflating: motofail_linux_osx/Superuser.apk

Test that adb is working at all while your phone is attached by running it with the devices command to list any connected Android devices.

If you see this, it means that the phone is not connected via USB or the kernel/UDEV did not detect and/or properly configure a newly connected USB device. Recheck your USB cabling and make sure that the phone is visible in the kernel dmesg and via lsusb.

jhoblitt@dull ~/droid4/motofail_linux_osx $ ./adb.linux devices
List of devices attached

If you see this, it means that the phone is visible as USB device but that adb doesn’t have the proper permissions to access it. This is the expect out of box behavior for most Linux distributions including Gentoo.

jhoblitt@dull ~/droid4/motofail_linux_osx $ ./adb.linux devices
List of devices attached 
????????????	no permissions

Now we need to fix the device permission the UDEV is setting up for the phone as a USB device. Find the USB vendor ID / product ID for the phone. All Droid4 / XT894s should be the same as my phone. The product ID will change depending on what USB connection mode the phone is set too. In this example the vendor ID is 22b8, which should be the same for all Motorola devices, and the product ID is 4331, which should be unique to the droid4.

jhoblitt@dull ~ $ lsusb
Bus 001 Device 001: ID 1d6b:0002 Linux Foundation 2.0 root hub
Bus 002 Device 001: ID 1d6b:0002 Linux Foundation 2.0 root hub
Bus 003 Device 001: ID 1d6b:0001 Linux Foundation 1.1 root hub
Bus 004 Device 001: ID 1d6b:0001 Linux Foundation 1.1 root hub
Bus 005 Device 001: ID 1d6b:0001 Linux Foundation 1.1 root hub
Bus 006 Device 001: ID 1d6b:0001 Linux Foundation 1.1 root hub
Bus 007 Device 001: ID 1d6b:0001 Linux Foundation 1.1 root hub
Bus 008 Device 001: ID 1d6b:0001 Linux Foundation 1.1 root hub
Bus 003 Device 007: ID 046d:c52b Logitech, Inc. Unifying Receiver
Bus 004 Device 003: ID 046d:c318 Logitech, Inc. Illuminated Keyboard
Bus 002 Device 007: ID 22b8:4331 Motorola PCS

I got an example udev rule from the cyanogenmod wiki and modified it to cover all of the droid4’s connection modes. I have since added a entry for the droid 4 to the cyanogegnmod wiki. The command below will not work under sudo so run it from a root shell.

# cat > /etc/udev/rules.d/51-android.rules << END
SUBSYSTEMS=="usb", ATTRS{idVendor}=="22b8", ATTRS{idProduct}=="4331", MODE="0660", OWNER="jhoblitt" # PC Mode
SUBSYSTEMS=="usb", ATTRS{idVendor}=="22b8", ATTRS{idProduct}=="4333", MODE="0660", OWNER="jhoblitt" # USB Mass Storage
SUBSYSTEMS=="usb", ATTRS{idVendor}=="22b8", ATTRS{idProduct}=="4335", MODE="0660", OWNER="jhoblitt" # Charge Only
SUBSYSTEMS=="usb", ATTRS{idVendor}=="22b8", ATTRS{idProduct}=="4337", MODE="0660", OWNER="jhoblitt" # Windows Media Sync
END

Disconnect / reconnect the phone to USB to trigger a udev event. adb should now be able to detect the phone.

jhoblitt@dull ~/droid4/motofail_linux_osx $ ./adb.linux devices
List of devices attached 
014FD7880F00700A	device

We’re now ready to run the root exploit code via the run.sh script in the motofail_linux_osx package. Ignore the line 22 shell script error, it doesn’t need to be fixed.

jhoblitt@dull ~/droid4/motofail_linux_osx $ ./run.sh 
./run.sh: line 22: [: too many arguments
[*]
[*] Motofail: Universal Motorola Gingerbread Root Exploit (Linux version)
[*] by Dan Rosenberg (@djrbliss)
[*]
[*] Tested on Droid 3, Droid Bionic, Droid RAZR, and Droid 4
[*]
[*] Before continuing, ensure USB debugging is enabled and that your phone
[*] is connected via USB.
[*]
[*] Press enter to root your phone...
[*]
[*] Waiting for device...
[*] Device found.
[*] Deploying payload...
3576 KB/s (501292 bytes in 0.136s)
[*] Owning phone...
[*] Motofail: Universal Motorola Android Root Exploit
[*] Copyright (c) 2012 Dan Rosenberg (@djrbliss)
[*] Exploit complete.
[*] Rebooting device...
[*] Waiting for phone to reboot.
[*] Attemping persistence...
remount succeeded
357 KB/s (22364 bytes in 0.061s)
3542 KB/s (1867568 bytes in 0.514s)
4438 KB/s (843503 bytes in 0.185s)
[*] Cleaning up...
[*] Motofail: Universal Motorola Android Root Exploit
[*] Copyright (c) 2012 Dan Rosenberg (@djrbliss)
[*] Exploit complete.
[*] Rebooting...
[*] Exploit complete!
[*] Press any key to exit.

And you should now be able to grand applications root privileges on your phone. One easy way to verify that the “rooting” worked is to install the Root Checker app from the Google Play marketplace.
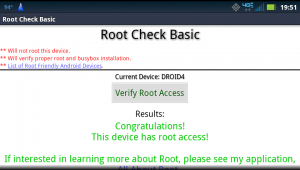
Root Checker app

How to enable quotas on an existing GPFS filesystem

| 0 comments

This step is unnecessary if when you created the filesystem you passed the -Q yes flag to the mmcrfs command. The default value in GPFS version 3.4.0-8 for -Q is no so you will not have active quota support unless you explicitly request it upon filesystem creation or follow this procedure. Please note that I have cut’n’paste together the commands below from different times so the reported timestamps may be out of sequence.

The manual says that the filesystem needs to be unmounted everywhere before enabling quotas.

[root@foonsd1 ~]# mmumount all -a
Sat Jun  2 13:36:17 MST 2012: mmumount: Unmounting file systems ...

First check to see if quotas are enabled or disabled on the filesystem in question.

[root@foo01 ~]# mmlsfs foodata1

File system attributes for /dev/foodata1:
=========================================
flag                value                    description
------------------- ------------------------ -----------------------------------
 -f                 131072                   Minimum fragment size in bytes
 -i                 512                      Inode size in bytes
 -I                 32768                    Indirect block size in bytes
 -m                 1                        Default number of metadata replicas
 -M                 2                        Maximum number of metadata replicas
 -r                 1                        Default number of data replicas
 -R                 2                        Maximum number of data replicas
 -j                 cluster                  Block allocation type
 -D                 nfs4                     File locking semantics in effect
 -k                 all                      ACL semantics in effect
 -n                 32                       Estimated number of nodes that will mount file system
 -B                 4194304                  Block size
 -Q                 none                     Quotas enforced
                    none                     Default quotas enabled
 --filesetdf        No                       Fileset df enabled?
 -V                 12.10 (3.4.0.7)          File system version
 --create-time      Wed Feb  8 18:34:14 2012 File system creation time
 -u                 Yes                      Support for large LUNs?
 -z                 No                       Is DMAPI enabled?
 -L                 4194304                  Logfile size
 -E                 Yes                      Exact mtime mount option
 -S                 Yes                      Suppress atime mount option
 -K                 whenpossible             Strict replica allocation option
 --fastea           Yes                      Fast external attributes enabled?
 --inode-limit      18300928                 Maximum number of inodes
 -P                 system                   Disk storage pools in file system
 -d                 nsd1;nsd2                Disks in file system
 -A                 yes                      Automatic mount option
 -o                 none                     Additional mount options
 -T                 /net/foodata1            Default mount point
 --mount-priority   0                        Mount priority

Here we see that they are not enabled:

-Q none Quotas enforced
none Default quotas enabled

Enable quotas on the filesystem with mmchfs and verify that the value of the -Q flag has changed.

[root@foo01 ~]# mmchfs foodata1 -Q yes
mmchfs: Propagating the cluster configuration data to all
  affected nodes.  This is an asynchronous process.
[root@decnsd1 ~]# mmlsfs foodata1 -Q
flag                value                    description
------------------- ------------------------ -----------------------------------
 -Q                 user;group;fileset       Quotas enforced
                    none                     Default quotas enabled

Now we need to run the mmcheckquota command to, as per the manual, “Compile inode and disk block statistics”.

[root@foo01 ~]# mmcheckquota -v /dev/foodata1
foodata1: Start quota check
  12 % complete on Thu May 31 16:56:29 2012
  25 % complete on Thu May 31 16:56:29 2012
  37 % complete on Thu May 31 16:56:29 2012
  50 % complete on Thu May 31 16:56:29 2012
  62 % complete on Thu May 31 16:56:29 2012
  75 % complete on Thu May 31 16:56:29 2012
  87 % complete on Thu May 31 16:56:29 2012
 100 % complete on Thu May 31 16:56:29 2012
Finished scanning the inodes for foodata1.
Merging results from scan.
foodata1: quota check found the following differences:
USR 0: 29 subblocks counted (was 0);  29 inodes counted (was 0)
USR 711: 2166372 subblocks counted (was 0);  1761 inodes counted (was 0)
USR 876: 7892150 subblocks counted (was 0);  41067 inodes counted (was 0)
USR 48: 2 subblocks counted (was 0);  2 inodes counted (was 0)
USR 212: 13928 subblocks counted (was 19);  437 inodes counted (was 4)
USR 950: 17568 subblocks counted (was 0);  15335 inodes counted (was 0)
USR 955: 1856593 subblocks counted (was 0);  67220 inodes counted (was 0)
USR 861: 758203 subblocks counted (was 0);  683 inodes counted (was 0)
GRP 0: 88 subblocks counted (was 0);  88 inodes counted (was 0)
GRP 224: 13868 subblocks counted (was 19);  377 inodes counted (was 4)
GRP 225: 2235969 subblocks counted (was 0);  53226 inodes counted (was 0)
GRP 100: 17568 subblocks counted (was 0);  15335 inodes counted (was 0)
GRP 48: 2 subblocks counted (was 0);  2 inodes counted (was 0)
GRP 112: 10437350 subblocks counted (was 0);  57506 inodes counted (was 0)
FILESET 0: 12704845 subblocks counted (was 19);  126534 inodes counted (was 4)

The filesystem can now be remounted and is ready to have quotas set on it.

[root@foonsd1 ~]# mmmount all -a
Sat Jun  2 13:37:03 MST 2012: mmmount: Mounting file systems ...